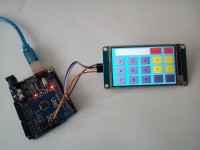
RPN Calculator with Arduino and Nextion Display

We propose to make a little calculator realising the four basic arithmetical operations using one Arduino and a Nextion touch display. This calculator uses the Reverse Polish Notation, which may recall good memories to the ones who used the old HP35 calculator...
This project is based on a classical Arduino uno (a Nano or a Mega can also be used) and a Nextion touch screen.
The two parts communicate using an Arduino serial RS232 line. In order to free the hardaware serial line (whiwch will be used as the programming line and possibly as a debug line), we will use the Arduino 'softwareSerial' library. So the communication will be established through pins 2 and 3 (but you can change this pins by modifying the '.ino' file which is the arduino program)..
The Nextion library folder (named "Nextion-master Arduino Uno Software Serial") contains a file named 'nexconfig.h' which is already configured to allow the communication with the display through a 'softwareSerial' line. All you have to do is to copy this folder into the 'libraries' folder of your Arduino IDE (you can simply remane it "Nextion-Master").
To program the display, simply copy the "Calulatrice.tft' file to a microSD card, insert the card in the socket of the display, power the display, wait for the end of the configuration, unpower the display and remove the card. The next time the display will be powered, the interface of the calculator will appear.
Using the Nextion Editor, you may completely modify the interface of the calculator by, for example, adding some functions such as 'sqrt' (square root). But, by doing this, you will also have to modify the Arduino program...
This RPN calculator is very easy to make and, because it uses a completely different method than the one used in the modern alphanumerical calculators, could be a good educative tool.


Mises à jour de l'auteur