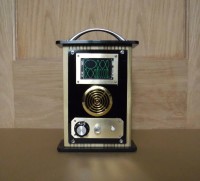
Lissajous Clock

Raspberry Pi Pico Lissajous Clock in the style of a Mantel timepiece.
This project displays the time using Lissajous figures on a (320 x 240) IPC LCD, two figures for hours and two figures for minutes and the seconds as a progress line.
Using a Raspberry Pi Pico (Pico Lip 4MB), programmed in MicoPython V1.18
Time is set with a RGB rotary encoder with the time maintained by an RTC (RV3028).
Powered via 5V USB with a Lipo (3.7V/500mAh), battery backup.
Current Consumption ~70mA
This is all contained within a wooden and Acrylic enclosure with brass accents in the form of a Mantel/Carriage clock complete with handle. Measuring 140(W) x 65(D) x 187(H) mm.
In addition to displaying the time in a different way the wooden enclosure is hand made from two short lengths of decking planks which are sandwiched together and then hollowed out to house the electronics this is then finished with Acrylic and brass.
Knowing that different Lissajous figures can be created by varying the input frequency with respect to a reference frequency. Its only a small step to realizing these figures in terms of numbers if we represent the number by the number of lobes in a Lissajous figure. By lobes this being the area bounded by the two peaks vertically aligned either side of the X-axis.
The numbers to be represented will be decimal values from 0 to 9.
From there we can create all the numbers required to indicate the time in 24H format
The numeric layout is somewhat dictated by components being used on this project.
This being the resolution and physical size of the display. (320 x 240 at 2 inches).
The screen is organised as 4 equal sized quadrants.
The top row represents the hours reading from left to right, tens then units.
The bottom row represents the minutes reading from left to right, tens then units.
The physical layout is arranged in the following manner.
1: Display Area
Shows the time as Lissajous figures.
Seconds are indicated by a line that increases in length from left to right horizontally.
The buttons on the display PCB are programmed to function enabling time setting only if the Mode switch is set, negating accidental setting.
A - Hours, X - Minutes and B - Set
However, due to the small size of the buttons, larger easier controls were fitted.
Additionally, the display is fitted behind a clear Acrylic screen for protection making the buttons inaccessible.
2: Sounder
Indicates hour intervals.
3; Controls
A simple mode selection switch which will enable or disable time adjustment.
A rotary encoder with colour mode indication, blue - adjust mode selected, green - time set.
Time is adjusted by rotating the knob forward or backwards changing minutes and hours through the 24 cycle.
A simple momentary push button that will program the time set when pressed.
Everything is mounted to the front panel to keep it compact.
Full build details can be found Here:
Lissajous Clock : 20 Steps (with Pictures) - Instructables


Discussion (1 commentaire(s))