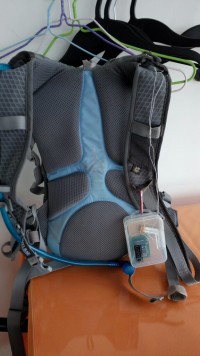
Camel bag water indicator [ 140375 ]

By doing many mountain bike by hot weather (where I live), to carry a camel bag (or equivalent) is very common.During a trip, I was always frustrated to never know what is my quantity of water remain in the bag. I spent long to to think about this during these trips. I imagined to put a sensor inside the water bag, or some water debit sensor but nothing satisfy me.
By doing many mountain bike by hot weather (where I live), to carry a camel bag (or equivalent) is very common.
During a trip, I was always frustrated to never know what is my quantity of water remain in the bag. I spent long to to think about this during these trips. I imagined to put a sensor inside the water bag, or some water debit sensor but nothing satisfy me.
Until, I read the capacitive liquid detector from Paul Cordonnier in the July Elektor magazine. With this idea, no need to put sensor inside, outside could work. Great idea from Paul. Thanks a lot to him.
Begin to make some test with an 74HC4060 in 3.3V (for working with battery lithium) and with a plastic bag full/empty of water and it's work. There is a variation of the frequency. To make it more simple, I use the stage 11 (pin 1) which is given a frequency around 150hz when empty and 60hz when full.
The next step was how to manage the data and display a simple 4 leds level of the water level. The first idea was to use a simple uC, like 12F51x from Microchip. More easy but less funny that an hardware solution. It will be for the second version later.
So, how to display the data ? As the frequency is lower when it is full, the '1' is longer. Why not to use this signal to launch another 4060 to count during this time and using the diviser 128/256/512/1024 to display on led the level.
The CLR on the 4060 is low active and I wanted to save the current, 4060 with the sensor will power the second 4060. With a pulse at power on to clear all the stage, it can work by choosing the right frequency (which should be around 30khz).
To display, I use some high efficient led with 10k resistor. It is enough, even outside under sunshine. To make the sensor, I use some adhesive copper, put vertical (I tried horizontal but not successful), in opposite side.
To calibrate, the clock of the second 4060 can be change. It is little bit tricky to find the right adjustment between empty detection and full display.
It is working, accurate enough for my need. I put it into a transparent box on my camel bag. Very light and useful.
Some new evolution plan:
- solar power panel to recharge the lithium battery
- Why not use an uC as plan at the beginning with a calibration for empty and full and avoid manual adjustment
Some pictures
Update August 16th:
-=> Add solar recharge for the LiPo battery.
To power the circuit, I'm using a small LiPo battery, 150mAh. To charge it, I use the same Ic than on the solarcam (other project) EUP8054. The only problem is this IC is in TSOP package and not easy to solder. I could test some other IC or make discrete one but this is an easy solution.
To charge, a small solar cell, 5V, 50mA, directly to the charger IC.
After few hours under sunshine, the battery was charged from 3.3v to 3.7V. I'm thinking to add another cell to increase the current.
Today, small trip, 2h bike, with some sunshine, end of afternoon. At the end, the battery was at same level than departure, 3.72V. So, even if the condition was not optimum, the battery didn t discharge.
The overall consumption of the circuit is 3mA. So, with all of this, autonomy should not be a problem. An external plug for USB charger can be plan when I'll do PCB
Next step will be to make the same circuit with uC...
Laurent


Discussion (1 commentaire(s))