
Basics of DS18B20
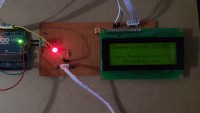
In this project, I have interfaced DS18B20 Temperature Sensor with Arduino and designed a Digital Thermometer.
Hello friends, I hope you all are doing great. In today's tutorial, I am going to share a really small project which I have designed here at my home and then I was searching this community so I thought to share it out here. It's my first project here so bear me out. :)
I have interfaced Arduino with temperature sensor DS18B20 and created a small Digital Thermometer. I have used these components in other to design this project.
Basics of DS18B20
DS18B20 is a one wire very precise and efficent temperature sensor. It can provide temperature accuracy up to four decimal point. I have also worked on other temperature sensors like LM35 and DHT11 but I have found DS18B20, best of all. It has only 3 Pins and we can also control multiple DS18B20 from single pin by calling respective address of slave sensors.
Components Used:
- Arduino UNO x 1
- DS18B20 x 1
- LCD (20x4) x 1
- LM7805 x 1
- Resistances.
- Capacitors.
Arduino Code for DS18B20:
I have used the below Arduino Code. This Arduino Code uses OneWire Library for DS18B20 and Crystal Liquid Library for LCD. I have displayed the values of atmospheric temperature on the LCD.
I have used the below Arduino Code. This Arduino Code uses OneWire Library for DS18B20 and Crystal Liquid Library for LCD. I have displayed the values of atmospheric temperature on the LCD.
- Here's the code:
    #include
    #include
    #include

    #define ONE_WIRE_BUS 2
    OneWire oneWire(ONE_WIRE_BUS);
    DallasTemperature sensors(&oneWire);

    LiquidCrystal lcd(12, 11, 7, 6, 5, 4);

    void setup(void)
    {
    Serial.begin(9600);
    Serial.println(“Welcome to TEP !!!”);
    Serial.println(“www.TheEngineeringProjects.com”);
    Serial.println();
    sensors.begin();

    lcd.begin(20, 4);
    lcd.setCursor(5,0);
    lcd.print(“Welcome to:”);
    lcd.setCursor(1,2);
    lcd.print(“www.TheEngineering”);
    lcd.setCursor(4,3);
    lcd.print(“Projects.com”);
    delay(5000);
    }

    void loop(void)
    {
    sensors.requestTemperatures();
    Serial.print(“Temperature : “);
    Serial.println(sensors.getTempCByIndex(0));
    //lcd.clear();
    lcd.setCursor(0,0);
    lcd.print(“Temperature: “);
    lcd.print(sensors.getTempCByIndex(0));
    lcd.print(“C”);
    delay(1000);
    }
Discussion (0 commentaire(s))